

How to Prevent Rot and Decay

Much of the rot and decay we see at Westbrook Restorations usually could have been prevented if just a little more time and attention was devoted to the project. When taking apart someone else’s prior construction, I find myself in the unique position of being able to see the results of a compromised structure or system. Over time, I’ve been able to apply what I’ve learned to better my building technique. Most tradespeople don't have the opportunity to return 10 or 15 years later to see how their work has (or hasn’t) held up against the elements, or get the opportunity to learn from what they see.

The Importance of Best Practice
I don’t blame anyone when I’m taking apart decay like this. I’ve made my fair share of mistakes, so what’s the point? Perhaps one reason why I feel so passionate about sharing the findings from a project like this is that it’s a real reminder that following best practice is important, and it provides craftspeople with a valuable learning opportunity. It may be more expensive to do things right in the first place, but it’s sure a lot less expensive than doing them twice—especially in such a short period of time (such as with this project).

Learning Opportunity: Identify What Failed and Why
The problems with this deck and railing were many fold, which is why we ended up with almost a complete rebuild. Typically, it’s best to take apart the worst areas first to determine how much really needs to be rebuilt—why rebuild the whole thing if it’s not needed?
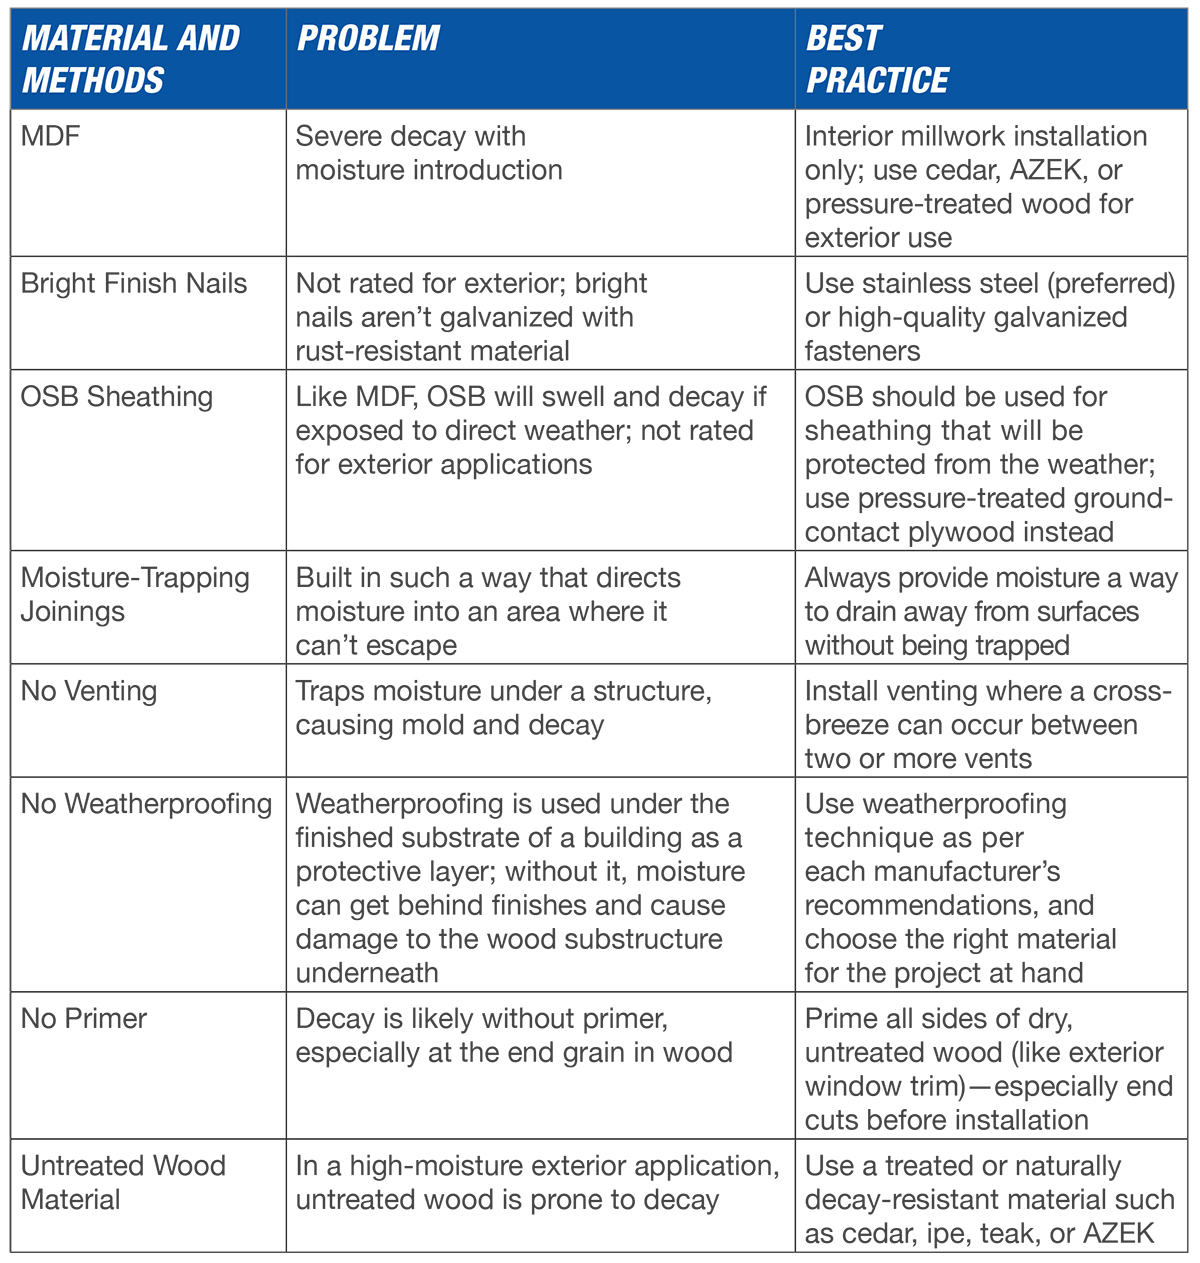
Take the time to identify what type of material was used originally, as well as how it was fastened together. This job site has extremely high moisture and unfortunately the materials used were not chosen wisely. Examples of materials used here originally (but not compatible with a high-moisture environment) are: medium-density fiberboard (MDF), bright finish nails (instead of galvanized or stainless steel), oriented strandboard (OSB), non-treated framing lumber—the list goes on and on. Additionally, best practices for ventilation and weatherproofing and priming were not implemented.
The common problem with each of these choices is that they weren’t made with environmental conditions in mind, and as a result, the materials didn’t hold up against the wet Pacific Northwest weather. Everything that could have gone wrong did go wrong, and, frankly, I’m amazed the deck lasted 10 years. This is an extreme example of lack of best practice, which is why we had to rebuild and redesign the deck from scratch—something that could have been avoided if only the time had been taken to identify the best materials and processes for the project up front. Now, the decay is our learning opportunity, teaching us how to build better.


Identify Best Practice Materials
As we were deconstructing and identifying the problems, I helped educate the owner so they could have a better understanding of why their deck failed. This is important because it helps me communicate what can (or should) be done and why, and which materials should be used to prevent decay from happening in the future.
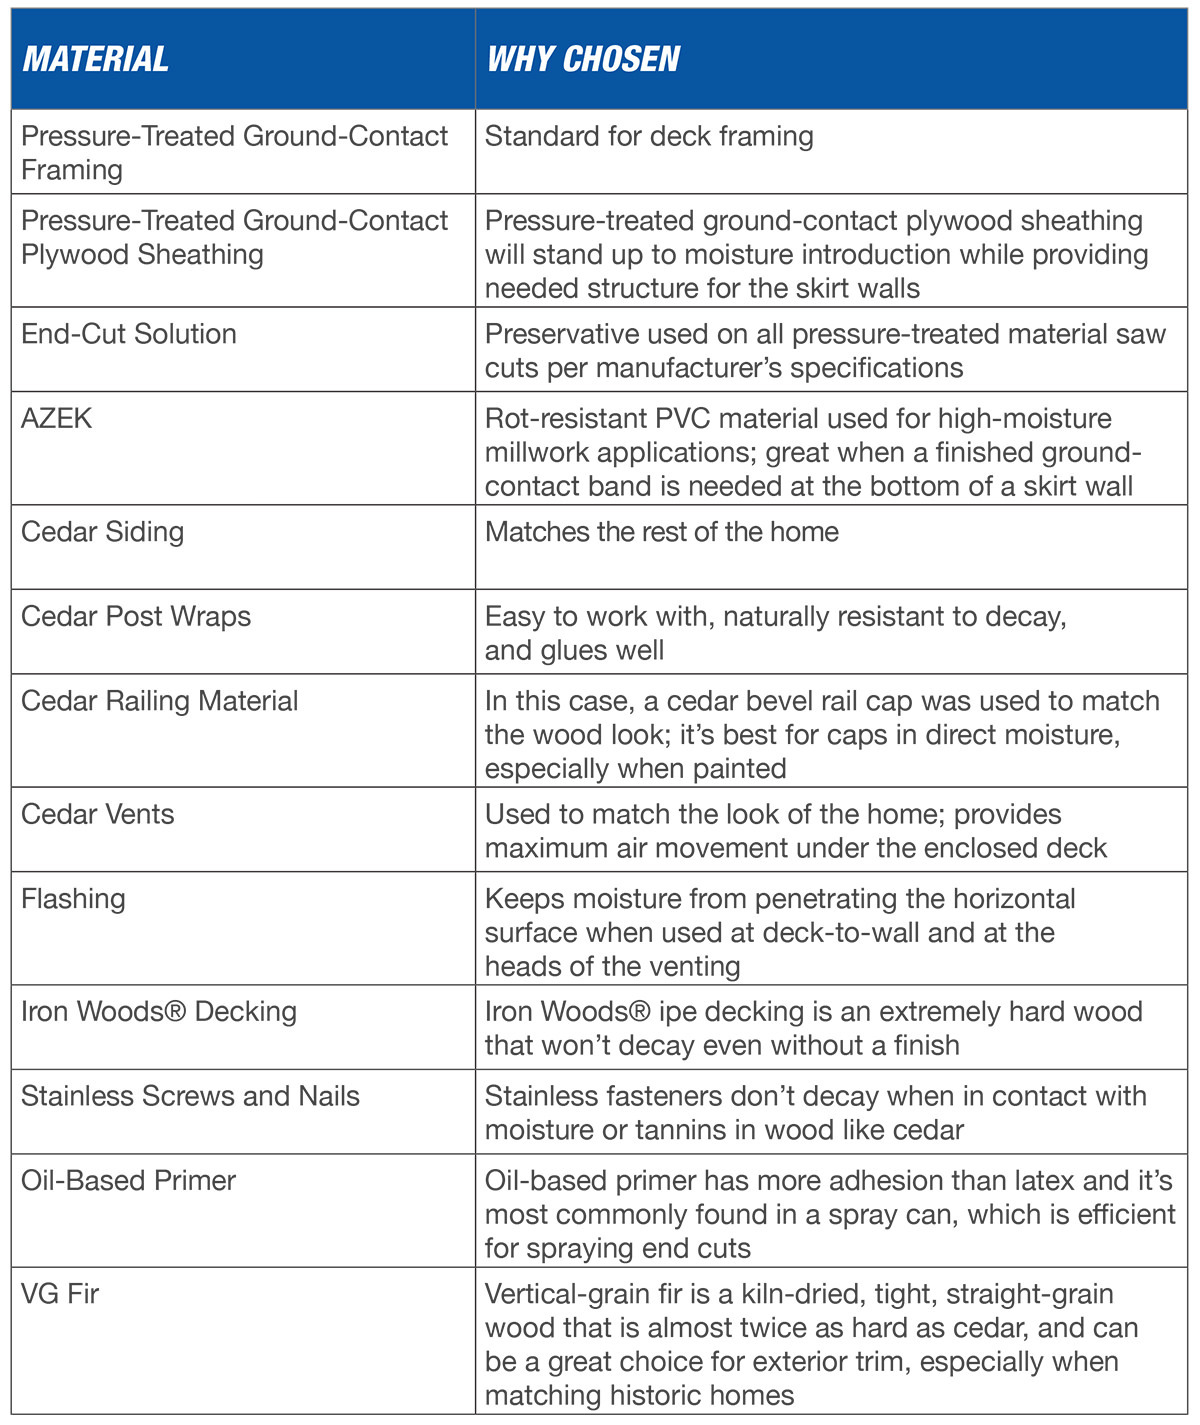
With this project, it was pretty easy to make the assessment to rebuild, which then gave us the opportunity to redesign the deck, stairs, and railing systems. It also allowed the owner to choose the material they wanted. The video shows the entire process, but I’ve created a handy chart below that outlines each of the materials used and why. The owner wanted to stay with wood as much as possible, and I’m not sure I could have done any better than cedar and ipe decking.

Design Changes and Installation Techniques for Longevity
The key to a long-lasting deck goes beyond materials—you have to design and install for sustainability, too. We were able to change the design to create as much air circulation as possible. For the railing, we used naturally rot-resistant cedar, and changed the design so the rails were more open. When I did the post wrap, I used a rabbet butt joint, which creates a reveal so I could apply caulking to the inside corner. I’ve found that with expansion and contraction over time, this joint stays strong and hides any possible seam separation. With a skirt wall under the deck, I like to use AZEK trim down into the ground and keep my framed wall up off the soil, even though I’m using pressure-treated ground-contact framing—it’s another longevity technique. I didn’t pre-prime every railing joint, but cedar is naturally resistant to decay and because we were using green materials for the balusters and rails, there wasn’t time to wait for drying. Thankfully, I think I’m on the safe side for this one.
Not all repairs are the same. Decks are one thing, but walls, trim, windows, and severe structural decay are quite another. That said, the procedural approach I use is the same for all of them: to resist rot, think it through and have a great plan for how everything will fit together before construction begins.

Building in a way that prevents decay in the Pacific Northwest is a practice that you need to keep up on, especially given the influx of so many available materials and products on the market today. It’s really up to the contractor or tradesperson to stay up-to-date and educated on best practices regarding installation techniques of manufacturer systems, and in identifying material for appropriate applications. Although decay and maintenance may never be totally eliminated, the idea of best practice ensures a build with as much longevity as possible—while working within the confines of circumstances at hand. This is my definition of quality.


